블로그 개선 - 뒤늦게 RSS와 sitemap 붙이기
tldr; 87개 글이 쌓인 뒤에야 블로그에 RSS 피드, sitemap, OG 메타태그를 붙였다.
블로그 돌아보기
며칠 전 블로그 구조를 전반적으로 돌아봤다. 글은 87개쯤 쌓였고 꾸준히 쓰고는 있는데, 그 글이 어떻게 발견되고 공유되는지에 대해서는 손 놓은 지 오래였다는 감이 들었다. 다크모드, 태그 네비게이션, 라우팅 구조, 다국어 등 눈에 띄는 리팩터링 거리는 여럿 있었지만, 가장 비어있는 건 다른 쪽이었다. 이 블로그는 Astro로 돌아간다. 각 글은 markdown이고, 발행 시점에 pnpm build로 정적 HTML이 떨어진다. 그런데 그 HTML의 <head>에는 <title> 한 줄 뿐이었다. description도 없고, OG도 없고, canonical도 없었다. 그리고 /sitemap.xml도, /rss.xml도 없었다. 콘텐츠는 있지만 공유 레이어가 통째로 비어있었다.이 블로그를 보는 사람이 많지는 않지만(공부일지나 일기처럼 쓰고 있어서..) 가장 가성비 좋은 개선은 이쪽이라고 봤다.
개념 용어 정리
작업 중 마주한 개념, 용어를 짧게 정리하고 가보자.
- sitemap: 사이트에 어떤 URL들이 있는지 적어둔 XML 파일. 검색엔진에게 주는 공식 “지도”. 없어도 크롤러가 링크를 타고 와서 어찌어찌 찾기는 하지만, 사이트가 커질수록 전부 발견시키려면 sitemap이 효율적이다. Google Search Console에 하나 제출해두면 색인되는 글 수와 크롤 상태를 그 안에서 모니터링할 수 있다.
- RSS: 사이트에 새 글이 올라올 때마다 구독자가 받아볼 수 있도록 글 목록을 XML로 공개하는 피드. Feedly나 Inoreader 같은 피드 리더에 사이트 주소만 등록해두면 알림/인박스 형태로 글이 쌓인다. sitemap이 검색엔진용 지도라면, RSS는 사람(구독자)에게 주는 공지 채널에 가깝다.
- canonical: 같은 콘텐츠가 여러 URL로 접근 가능할 때 (http/https, www/apex, trailing slash 유무, 쿼리 파라미터 포함 여부 등) “이 URL이 정식 주소다” 라고 선언하는
<link rel="canonical">태그. 검색엔진이 중복 색인을 피하는 근거가 된다. - OG (Open Graph): 링크를 메신저나 SNS에 붙여넣었을 때 뜨는 미리보기 — 제목, 설명, 썸네일 — 의 규격.
<meta property="og:*">로 선언한다. 페이스북이 만들어서 지금은 사실상 모든 플랫폼이 읽는다. - apex 도메인:
joykim.site처럼 서브도메인 없는 root. 반대로www.joykim.site는www.라는 서브도메인이 붙은 호스트. 둘은 엄연히 다른 호스트이고, 어느 쪽을 “진짜” 호스트로 둘지 결정하는 게 뒤에서 삽질 포인트로 등장한다.
작업 내용
- 각 페이지 head에 description, canonical, OG, Twitter 메타태그
@astrojs/sitemap으로/sitemap-index.xml자동 생성@astrojs/rss로/rss.xml엔드포인트 추가 (posts + logs 통합)
글 상세는 article 타입에 article:published_time, article:tag까지 노출
sitemap은 간단했다. @astrojs/sitemap을 integration으로 등록하면 build 때 /sitemap-index.xml이 자동으 떨어진다.
// astro.config.mjs
import sitemap from "@astrojs/sitemap";

export default defineConfig({
site: "https://www.joykim.site",
integrations: [react(), sitemap()],
// ...
});
RSS는 integration이 아니라 엔드포인트 쪽이다. src/pages/rss.xml.ts에 handler를 하나 만들어두면 된다.
import rss from "@astrojs/rss";
import { getCollection } from "astro:content";
import { COLLECTION_KEYS } from "../lib/collections";

export async function GET(context) {
const items = (
await Promise.all(
COLLECTION_KEYS.map(async (key) => {
const entries = await getCollection(key, ({ data }) => data.published);
return entries.map((entry) => ({
title: entry.data.title,
pubDate: entry.data.date,
description: entry.data.description,
link: `/${key}/${[entry.id](http://entry.id)}/`,
categories: entry.data.tags,
}));
}),
)
)
.flat()
.sort((a, b) => b.pubDate.getTime() - a.pubDate.getTime());

return rss({
title: "joykim.site",
description: "software engineer, multidisciplinary art & tech",
site: context.site,
items,
});
}
문제는 메타태그 쪽이었다. 홈, 글 목록, 글 상세 — 이 세 페이지 head에 같은 모양의 OG/Twitter/canonical 블록을 각각 복붙해 넣고 있었다. 15줄짜리가 세 곳. 변경할 일 생기면 세 곳을 다 바꿔야 한다. 그래서 작은 컴포넌트로 빼고 재사용할 수 있게 소소한 개선까지 챙겼다.
---
// src/components/SiteMeta.astro
interface Props {
  title: string;
  description: string;
  path: string;
  type?: "website" | "article";
  article?: { publishedTime: string; tags?: string[] };
}
const { title, description, path, type = "website", article } = Astro.props;
const canonical = new URL(path, Astro.site).toString();
---

<title>{title}</title>
<meta name="description" content={description} />
<link rel="canonical" href={canonical} />
<link rel="alternate" type="application/rss+xml" title="joykim.site" href="/rss.xml" />
<meta property="og:type" content={type} />
<meta property="og:site_name" content="joykim.site" />
<meta property="og:locale" content="ko_KR" />
<meta property="og:title" content={title} />
<meta property="og:description" content={description} />
<meta property="og:url" content={canonical} />
{article && <meta property="article:published_time" content={article.publishedTime} />}
{article?.tags?.map((tag) => <meta property="article:tag" content={tag} />)}
<meta name="twitter:card" content="summary" />
<meta name="twitter:title" content={title} />
<meta name="twitter:description" content={description} />
호출부 깔끔. SiteMeta 컴포넌트로 추상화되었다.
<SiteMeta
  title={entry.data.title}
  description={description}
  path={`/${kind}/${entry.id}/`}
  type="article"
  article={{
    publishedTime: entry.data.date.toISOString(),
    tags: entry.data.tags,
  }}
/>
삽질 하나 — GSC가 sitemap을 “읽을 수 없음”
Google Search Console에 sitemap-index.xml을 제출했는데 바로 읽을 수 없음이 떴다. 발견된 페이지가 0개로 떴다.
curl -sI로 상태만 보면 정상이다. 200 반환, content-type은 application/xml. 그런데 자세히 보니:
HTTP/2 308
location: <https://www.joykim.site/sitemap-index.xml>
apex 도메인에 요청이 들어가면 www로 308 redirect가 되고 있었다. Vercel 쪽 기본 설정이다. 이것 자체는 문제가 아니었다. 문제는 sitemap 내부 였다.
<sitemapindex>
  <sitemap>
    <loc>https://joykim.site/sitemap-0.xml</loc>   <!-- apex -->
  </sitemap>
</sitemapindex>
Astro site: "https://joykim.site"를 그대로 쓰고 있어서, sitemap 안의 <loc>가 apex를 가리켰다. Google 입장에선:
-
joykim.site/sitemap-index.xml요청 → 308 →www.joykim.site에서 받음 -
열어보니 안에
joykim.site/sitemap-0.xml참조
“지금 www에서 받고 있는데 내용은 apex를 가리키네?”
Google은 sitemap 안의 URL이 그 sitemap을 서빙한 호스트와 일치하길 바란다. 그래서 cross-host로 간주하고 reject.
canonical과 og:url도 같은 이유로 apex를 뱉고 있었다. 실제 서빙은 www라서 “어느 쪽을 색인할지 모호”한 문제가 잠복해 있었던 거다.
고치는 건 생각보다 간단하다. config를 수정하면 된다.
//AS-IS
site: "https://joykim.site",

//TO-BE
site: "https://www.joykim.site",
이 값 하나로 sitemap <loc>, canonical, og:url 전부가 www로 통일됐다. Vercel의 리다이렉트 방향을 뒤집는 대안도 고려했었지만 (apex를 primary로 두기), 그러려면 DNS에서 apex A 레코드 재설정 (가비아 쓰고 있음..) + Vercel 도메인 설정 변경이 필요했다. “지금 www가 사실상의 primary 호스트”이며, config설정이 훨씬 작은 변경이라는 판단이었다.
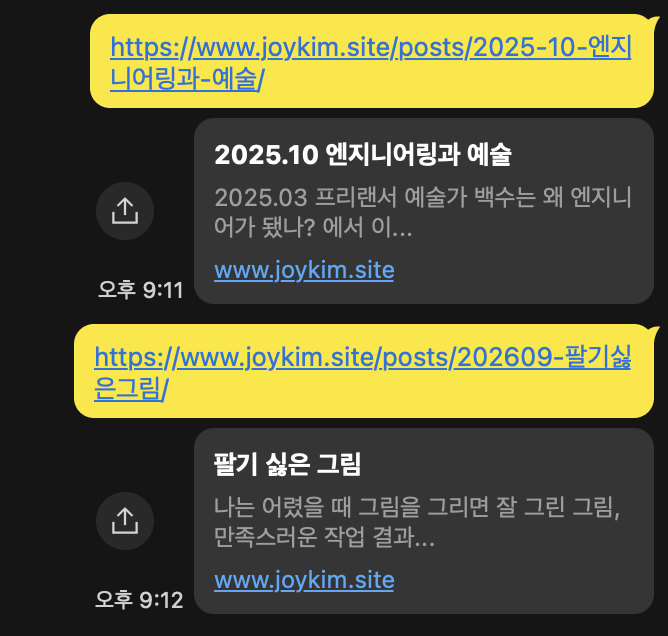
OG 디스크립션 — iMessage에 제목이 두 번
이렇게 sitemap 설정, OG설정을 한 뒤, 최근 글 하나 링크를 iMessage로 보내 테스트해봤더니 미리보기에 제목 “팔기 싫은 그림” 아래 또 “팔기 싫은 그림” 이 떴다. OG description에 title이 그대로 들어가 있던 것. 왜냐? 내가 코드를 그렇게 써둠 당연함.. SiteMeta에 넘기는 description을 이렇게 썼었다.
const description = entry.data.description ?? entry.data.title;frontmatter에 description이 있으면 그걸 쓰고, 없으면 title 폴백. 그런데 내 글 중 description을 쓴 글은 손에 꼽는다(ㅋㅋ.. 만들어두고 귀찮아서 안쓰게 됨. 기능을 없애버려야겠다). 결과적으로 거의 모든 글이 OG description에 title이 그대로 들어가 있었다.
근데 또, 실제 글 목록 페이지는 이미 이 상황을 해결하고 있었다는 점이다. 페이지에서는markdown 노이즈(코드블록, 링크 문법, 헤더)를 제거하고 200자로 자르는 `excerpt()` 함수가 인라인으로 돌고 있었다. 그 로직을 lib/excerpt.ts로 옮겨서 두 곳에서 공유하기로 했다.
// src/lib/excerpt.ts
export function excerpt(md: string, max = 200): string {
return md
.replace(/\`\`\`\[\\s\\S\]\*?\`\`\`/g, "")
.replace(/\`\[^\`\]+\`/g, "")
.replace(/!\\\[\[^\\\]\]\*\\\]\\(\[^)\]\*\\)/g, "")
.replace(/\\\[(\[^\\\]\]+)\\\]\\(\[^)\]+\\)/g, "$1")
.replace(/^#{1,6}\\s+/gm, "")
.replace(/^\\s\*>\\s+/gm, "")
.replace(/^\\s\*\[-\*+\]\\s+/gm, "")
.replace(/\\\*\\\*|\_\_|\\\*|\_|\~\~/g, "")
.replace(/\\\[\\^\[^\\\]\]+\\\]/g, "")
.replace(/\\s+/g, " ")
.trim()
.slice(0, max);
}
//AS-IS
const description = entry.data.description ?? entry.data.title;
//TO-BE
const body = (entry as { body?: string }).body ?? "";
const description = entry.data.description ?? excerpt(body);지금은 frontmatter에 description이 없으면 본문 첫 ~200자가 OG description으로 들어간다. iMessage, 카카오톡, Discord 모두 정상 미리보기가 된다! (편안!)
 (급 마무리) 앞으로도 조금씩 블로그를 개선해나갈 예정..